LOAD BALANCING: The Oracle RAC system can distribute the load over many nodes this feature called as load balancing.
There are two methods of load balancing
1.Client load balancing
2.Server load balancing
Client Load Balancing distributes new connections among Oracle RAC nodes so that no one server is overloaded with connection requests and it is configured at net service name level by providing multiple descriptions in a description list or multiple addresses in an address list. For example, if connection fails over to another node in case of failure, the client load balancing ensures that the redirected connections are distributed among the other nodes in the RAC.
Configure Client-side connect-time load balancing by setting LOAD_BALANCE=ON in the corresponding client side TNS entry.
TESTRAC =
(DESCRIPTION =
(ADDRESS_LIST=
(LOAD_BALANCE = ON)
(ADDRESS = (PROTOCOL = TCP)(HOST = TESTRAC1-VIP)(PORT = 1521))
(ADDRESS = (PROTOCOL = TCP)(HOST = TESTRAC2-VIP)(PORT = 1521))
)
(CONNECT_DATA = (SERVICE_NAME = testdb.oracleracexpert.com))
)
Server Load Balancing distributes processing workload among Oracle RAC nodes. It divides the connection load evenly between all available listeners and distributes new user session connection requests to the least loaded listener(s) based on the total number of sessions which are already connected. Each listener communicates with the other listener(s) via each database instance’s PMON process.
Configure Server-side connect-time load balancing feature by setting REMOTE_LISTENERS initialization parameter of each instance to a TNS name that describes list of all available listeners.
TESTRAC_LISTENERS =
(DESCRIPTION =
(ADDRESS_LIST =(ADDRESS = (PROTOCOL = TCP)(HOST = TESTRAC1)(PORT = 1521)))
(ADDRESS_LIST =(ADDRESS = (PROTOCOL = TCP)(HOST = TESTRAC2)(PORT = 1521))))
)
Set *.remote_listener= TESTRAC_LISTENERS’ initialization parameter in the database’s shared SPFILE and add TESTRAC_LISTENERS’ entry to the TNSNAMES.ORA file in the Oracle Home of each node in the cluster.
Once you configure Server-side connect-time load balancing, each database’s PMON process will automatically register the database with the database’s local listener as well as cross-register the database with the listeners on all other nodes in the cluster. Now the nodes themselves decide which node is least busy, and then will connect the client to that node.
FAILOVER:
The Oracle RAC system can protect against failures caused by O/S or server crashes or hardware failures. When a node failure occurs in RAC system, the connection attempts can fail over to other surviving nodes in the cluster this feature called as Failover.
There are two methods of failover
1. Connection Failover
2. Transparent Application Failover (TAF)
Connection Failover - If a connection failure occurs at connect time, the application failover the connection to another active node in the cluster. This feature enables client to connect to another listener if the initial connection to the first listener fails.
Enable client-side connect-time Failover by setting FAILOVER=ON in the corresponding client side TNS entry.
TESTRAC =
(DESCRIPTION =
(ADDRESS_LIST=
(LOAD_BALANCE = ON)
(FAILOVER = ON)
(ADDRESS = (PROTOCOL = TCP)(HOST = TESTRAC1-VIP)(PORT = 1521))
(ADDRESS = (PROTOCOL = TCP)(HOST = TESTRAC2-VIP)(PORT = 1521))
)
(CONNECT_DATA = (SERVICE_NAME = testdb.oracleracexpert.com))
)
If LOAD_BALANCE is set to on then clients randomly attempt connections to any nodes. If client made connection attempt to a down node, the client needs to wait until it receives the information that the node is not accessible before trying alternate address in ADDRESS_LIST.
Transparent application Failover (TAF) – If connection failure occurs after a connection is established, the connection fails over to other surviving nodes. Any uncommitted transactions are rolled back and server side program variables and session properties will be lost. In some case the select statements automatically re-executed on the new connection with the cursor positioned on the row on which it was positioned prior to the failover.
TESTRAC =
(DESCRIPTION =
(LOAD_BALANCE = ON)
(FAILOVER = ON)
(ADDRESS = (PROTOCOL = TCP)(HOST = TESTRAC1-VIP)(PORT = 1521))
(ADDRESS = (PROTOCOL = TCP)(HOST = TESTRAC1-VIP)(PORT = 1521))
(CONNECT_DATA =
(SERVICE_NAME = testdb.oracleracexpert.com)
(FAILOVER_MODE = (TYPE = SELECT)(METHOD = BASIC)(RETRIES = 180)(DELAY = 5))
)
)
Regards,
Satishbabu Gunukula
http://www.oracleracexpert.com
Tuesday, January 26, 2010


Delete duplicate rows from Oracle Table:
There are several techniques to delete duplicate rows from a table, but the most effective way is to join the table against itself. Always make sure to select the duplicate data before you delete using below queries.
1. Delete duplicate rows based on one column value using ROWID
SQL> delete from dup_table t1 where rowid < ( select max(rowid) from dup_table t2 where t1.ename = t2.ename);
2. Use the below query to delete the rows suing Oracle analytic functions
SQL> Delete from dup_table
where rowid in ( select rowid from
( select rowid , row_number() over (partition by col1 order by upper col1 ) row_num from dup_table ) where rno > 1 );
3. You must specify all columns that make the row duplicate in the query, use the below query to delete duplicate records based on two columns or composite unique key
where rowid > (select min(rowid) from dup_table t2
where upper(t2.col1) = upper(t1.col1)
and upper(t2.col2) = upper(t1.col2)
);
-- or --
where rowid < (select max(rowid) FROM dup_table t2
where t1.col1=t2.col1 AND t1.col2=t2.col2 );
-- or --
where rowid <> ( select max(rowid) from dup_table t2
where t2.col1 = t1.col1
and t2.col2 = t1.col2 )
4. If the fields match on the NULL value then duplicate fails to remove the duplicate rows. In this situation add a null check
SQL> delete from dup_table t1
where t1.rowid > ANY (select t2.rowid FROM dup_table t2
where (t1.col1 = t2.col1 OR (t1.col1 is null AND t2.col1 is null))
and
(t1.col2 = t2.col2 OR (t1.col2 is null AND t2.col2 is null))
);
If the table contains duplicate data in upper case and lower case, use below query to delete to delete the data
SQL> delete from dup_table
where rowid in ( select rid from ( select rowid rid, row_number() over (partition by upper(col1) order by upper(col2)) rno from dup_table )
where rno > 1
);
Satishbabu Gunukula
http://www.oracleracexpert.com
Wednesday, December 30, 2009
Time difference between the RAC nodes is out of sync
If the time difference between the RAC nodes is out of sync (time difference > 30 sec) then it will result one of the following issues
1. CRS installation failure on remote node
2. RAC node reboots periodically
3. CRS Application status UKNOWN or OFFLINE
To avoid these issues configure NTP (Network Time Protocol) on both nodes using any one of the following methods
1. system-config-time or system-config-date or dateconfig
Type command system-config-time or system-config-date or dateconfig at terminal --> Click “Network Time Protocol” ->check “Enable Network Time Protocol” and select NTP server --> Click OK
2. date MMDDHHMMSYY
Type command date with current date and time
3. /etc/ntp.conf
Update /etc/ntp.conf file with timeservers IP addresses and start or restart the ntp daemon
$ /etc/init.d/ntp start
or
$ /etc/rc.d/init.d/ntp start
Once RAC nodes are time sync you might need to shutdown and startup the CRS applications manually.
$ crs_stop ora.testrac1.ons
$ crs_start ora.testrac1.ons
In case if you encounter CRS-0223: Resource 'ora.testrac1.ons’ has placement error then stop and start all CRS Applications to resolve the issue.
$ crs_stop -all
$ crs_start -all
Regards,
Satishbabu Gunukula
http://www.oracleracexpert.com/
1. CRS installation failure on remote node
2. RAC node reboots periodically
3. CRS Application status UKNOWN or OFFLINE
To avoid these issues configure NTP (Network Time Protocol) on both nodes using any one of the following methods
1. system-config-time or system-config-date or dateconfig
Type command system-config-time or system-config-date or dateconfig at terminal --> Click “Network Time Protocol” ->check “Enable Network Time Protocol” and select NTP server --> Click OK
2. date MMDDHHMMSYY
Type command date with current date and time
3. /etc/ntp.conf
Update /etc/ntp.conf file with timeservers IP addresses and start or restart the ntp daemon
$ /etc/init.d/ntp start
or
$ /etc/rc.d/init.d/ntp start
Once RAC nodes are time sync you might need to shutdown and startup the CRS applications manually.
$ crs_stop ora.testrac1.ons
$ crs_start ora.testrac1.ons
In case if you encounter CRS-0223: Resource 'ora.testrac1.ons’ has placement error then stop and start all CRS Applications to resolve the issue.
$ crs_stop -all
$ crs_start -all
Regards,
Satishbabu Gunukula
http://www.oracleracexpert.com/
Set DISPLAY variable & Enable access control
Before starting the Oracle Universal Installer, the DISPLAY environment must be set correctly for display terminal support. To set the DISPLAY environment run the following command where hostname is the hostname or IP address of the system where the X server is running:
$ export DISPLAY=hostname:0.0
It may be necessary to enable access control on the system where the X server is running, so that the clients can connect. The "xhost" command is used to set access controls. The xhost command must be run on the console of the system where the X server is running. It cannot be done remotely.
To enable access control so that clients from any host can connect to the X server, type the following command:
$ xhost +
access control disabled, clients can connect from any host
To enable access control only to certain clients run the following command
$ xhost +hostname
For ex:- $ xhost +server1
Server1 being added to access control list
Common Errors:-
1. Error: Can't open display
Error: Couldn't find per display Information
Solution: 1. Run xhost + to enable access control
2. Set your DISPLAY
Regards,
Satishbabu Gunukula
http://www.oracleracexpert.com/
$ export DISPLAY=hostname:0.0
It may be necessary to enable access control on the system where the X server is running, so that the clients can connect. The "xhost" command is used to set access controls. The xhost command must be run on the console of the system where the X server is running. It cannot be done remotely.
To enable access control so that clients from any host can connect to the X server, type the following command:
$ xhost +
access control disabled, clients can connect from any host
To enable access control only to certain clients run the following command
$ xhost +hostname
For ex:- $ xhost +server1
Server1 being added to access control list
Common Errors:-
1. Error: Can't open display
Error: Couldn't find per display Information
Solution: 1. Run xhost + to enable access control
2. Set your DISPLAY
Regards,
Satishbabu Gunukula
http://www.oracleracexpert.com/
Wednesday, December 23, 2009
Duplicate RAC Database Using RMAN
Oracle provides following methods to convert a single instance database to RAC. You can choose any method based upon your convince.
1. Manual (Using RMAN)
2. Enterprise Manager
3. DBCA
4. RCONFIG (from 10gR2)
Duplicating RAC database is very simple, first duplicate RAC Database to a single instance using RMAN and convert the single instance into a RAC cluster. Please note that straight RAC to RAC duplicate is not possible.
Follow the simple steps to duplicate RAC Database using ASM or other filesystem.
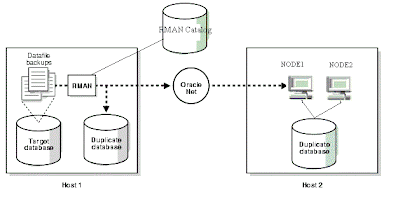
Step1: Create a parameter file for duplicate database(auxiliary)
The easy ways is copy Init.ora parameter from Target database, replace the Target database name with Auxiliary database name and comment all RAC related parameters for ex:- cluster_database, cluster_instances, thread ...Etc
Set CONTROL_FILES to two copies of the control file to +DISKGRP or file system
Step 2: Set DB_FILE_NAME_CONVERT and LOG_FILE_NAME_CONVERT to convert the datafile and redo log file names from +DISKGRP1 to +DISKGRP2 or /dbs1 to /dbs2 (For Non-ASM file systems)
Also Set DB_CREATE_FILE_DEST and DB_CREATE_ONLINE_DEST_n to ‘+DISKGRP2’ or /dbs2
Step 3: set _no_recovery_through_resetlogs=TRUE parameter to avoid internal Bug 4355382 ORA-38856: FAILED TO OPEN DATABASE WITH RESETLOGS WHEN USING RAC BACKUP
Step 4: Create a password file for auxiliary database using below command.
$ orapwd file=orapwdupDB password=xxxxxxxx
Step 5: Create a static listener for auxiliary database and reload, because auxiliary database will not register itself with the listener.
(SID_DESC =
(GLOBAL_DBNAME =dupDB.oracleracexpert.com)
(ORACLE_HOME = /oracle/product/db/10202)
(SID_NAME = dupDB)
)
Step 6: Take Full database backup of Target database
RMAN > backup database plus archivelog;
Copy the backup dumps from Target to Auxiliary host. If backup directory structure is different then update the RMAN configuration of the target database to reflect the new backup location
RMAN> CONFIGURE CHANNEL DEVICE TYPE DISK FORMAT '/oracle/rman/dupDB';
Step7: Set ORACLE_SID and start auxiliary database in NO MOUNT state
$ export ORACLE_SID=dupDB
SQL> startup nomount
Step 8: Duplicate Target Database using RMAN Duplicate command
RMAN> CONNECT TARGET /;
RMAN> CONNECT CATALOG rman/*****@catadb;
RMAN> CONNECT AUXILIARY sys/*****@dupDB;
RMAN> DUPLICATE TARGET DATABASE TO dupDB;
Step 9: Add second thread of online redo logs and enable that thread:
SQL> alter database add logfile thread 2
group 3 ('+DISKGRP1','+DISKGRP2') size 50m reuse;
SQL> alter database add logfile thread 2
group 4 ('+DISKGRP1','+DISKGRP2') size 50m reuse;
SQL> alter database enable public thread 2;
For Non-ASM file systems replace ‘+DISKGRP1’, ‘+DISKGRP2' with actual file systems path
Step 10: Uncomment or add all RAC related parameters, shutdown the instance and startup both Instances.
Step 11: create spfile on the shared storage, because all instances must use the same server parameter file. See the link to “Create spfile from pfile”.
Step12: Register RAC instances with CRS
$ srvctl add database -d dupDB -o /oracle/product/db/10202
$ srvctl add instance -d dupDB -i dupDB1 -n testrac01
$ srvctl add instance -d dupDB -i dupDB2 -n testrac02
Step13: Shutdown and startup instances using srvctl
$ srvctl start database –d dupDB
Regards,
Satishbabu Gunukula
http://www.oracleracexpert.com/
1. Manual (Using RMAN)
2. Enterprise Manager
3. DBCA
4. RCONFIG (from 10gR2)
Duplicating RAC database is very simple, first duplicate RAC Database to a single instance using RMAN and convert the single instance into a RAC cluster. Please note that straight RAC to RAC duplicate is not possible.
Follow the simple steps to duplicate RAC Database using ASM or other filesystem.

Step1: Create a parameter file for duplicate database(auxiliary)
The easy ways is copy Init.ora parameter from Target database, replace the Target database name with Auxiliary database name and comment all RAC related parameters for ex:- cluster_database, cluster_instances, thread ...Etc
Set CONTROL_FILES to two copies of the control file to +DISKGRP or file system
Step 2: Set DB_FILE_NAME_CONVERT and LOG_FILE_NAME_CONVERT to convert the datafile and redo log file names from +DISKGRP1 to +DISKGRP2 or /dbs1 to /dbs2 (For Non-ASM file systems)
Also Set DB_CREATE_FILE_DEST and DB_CREATE_ONLINE_DEST_n to ‘+DISKGRP2’ or /dbs2
Step 3: set _no_recovery_through_resetlogs=TRUE parameter to avoid internal Bug 4355382 ORA-38856: FAILED TO OPEN DATABASE WITH RESETLOGS WHEN USING RAC BACKUP
Step 4: Create a password file for auxiliary database using below command.
$ orapwd file=orapwdupDB password=xxxxxxxx
Step 5: Create a static listener for auxiliary database and reload, because auxiliary database will not register itself with the listener.
(SID_DESC =
(GLOBAL_DBNAME =dupDB.oracleracexpert.com)
(ORACLE_HOME = /oracle/product/db/10202)
(SID_NAME = dupDB)
)
Step 6: Take Full database backup of Target database
RMAN > backup database plus archivelog;
Copy the backup dumps from Target to Auxiliary host. If backup directory structure is different then update the RMAN configuration of the target database to reflect the new backup location
RMAN> CONFIGURE CHANNEL DEVICE TYPE DISK FORMAT '/oracle/rman/dupDB';
Step7: Set ORACLE_SID and start auxiliary database in NO MOUNT state
$ export ORACLE_SID=dupDB
SQL> startup nomount
Step 8: Duplicate Target Database using RMAN Duplicate command
RMAN> CONNECT TARGET /;
RMAN> CONNECT CATALOG rman/*****@catadb;
RMAN> CONNECT AUXILIARY sys/*****@dupDB;
RMAN> DUPLICATE TARGET DATABASE TO dupDB;
Step 9: Add second thread of online redo logs and enable that thread:
SQL> alter database add logfile thread 2
group 3 ('+DISKGRP1','+DISKGRP2') size 50m reuse;
SQL> alter database add logfile thread 2
group 4 ('+DISKGRP1','+DISKGRP2') size 50m reuse;
SQL> alter database enable public thread 2;
For Non-ASM file systems replace ‘+DISKGRP1’, ‘+DISKGRP2' with actual file systems path
Step 10: Uncomment or add all RAC related parameters, shutdown the instance and startup both Instances.
Step 11: create spfile on the shared storage, because all instances must use the same server parameter file. See the link to “Create spfile from pfile”.
Step12: Register RAC instances with CRS
$ srvctl add database -d dupDB -o /oracle/product/db/10202
$ srvctl add instance -d dupDB -i dupDB1 -n testrac01
$ srvctl add instance -d dupDB -i dupDB2 -n testrac02
Step13: Shutdown and startup instances using srvctl
$ srvctl start database –d dupDB
Regards,
Satishbabu Gunukula
http://www.oracleracexpert.com/
Subscribe to:
Posts (Atom)